 FR
 EN
 ES
 IT

Repairing a leather jacket: scuffs, snags and surface cracks
A sleeve catching on a door handle, a rub against a railing, a slide on the road that leaves its mark on the shoulder: over time, leather gets scratched and nicked.
The good news is that a leather jacket damaged on the surface can almost always be put right at home, with no tailor and no sewn patch, as long as you stay on the side of the hide that you can still work on yourself.
This page brings together the useful products, the method step by step and, above all, the limit not to cross: as soon as the leather is punctured right through, it is a professional’s job.
Our products for repairing a leather jacket
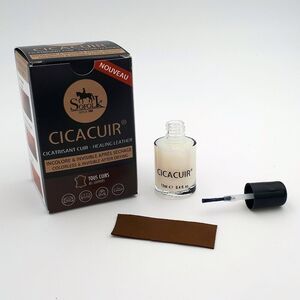
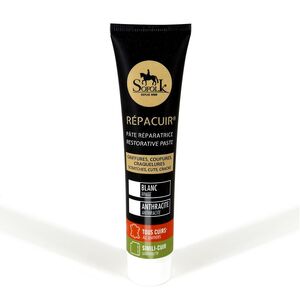
Which types of leather jacket damage can you repair yourself?
One principle settles everything first: at home, you only treat the surface. As long as the hide is intact, the mark can be filled and disguised. As soon as it is pierced or a seam gives way, the home repair stops and a specialist takes over.
- Superficial scratches and scuffs: the colourless healing glue lays the raised fibres flat again and blends into the grain as it dries, without any extra thickness.
- Surface snags: the healing glue bonds the edges together; for a neat finish, follow it with a touch of repair paste before restoring the colour.
- Shallow cracks and splits: if the leather is simply dry, nourishing it in time often closes these fine cracks and makes the paste unnecessary; where a hollow remains, the repair paste fills it, and once sanded and recoloured the area becomes smooth and even again.
- Leather stiffened around the mark: a softening balm relaxes the cardboard-like hide before you work on the surface.
That leaves the case where you stop tinkering: a tear that goes through the hide or follows a seam. There, filling is not enough, and this page stops.
Plugging a hole that goes through the leather calls for an entirely different method, which we cover separately, and on a protective garment it should not be attempted at all: a professional examines the jacket before it is worn again.
How do you repair a leather jacket in 4 steps?
The order matters more here than the force of your hand. Each step prepares the next: you do not fill greasy leather, and you do not recolour a surface left raw.
Step 1: clean and degrease the leather
A paste never adheres to greasy or dusty hide. So start by cleaning a leather jacket before repairing it, paying particular attention to the mark and the area around it, then leave it to dry right through.
A clean fibre takes the treatment; a grimy fibre seals the dirt under the repair.
Step 2: fill with healing glue or paste
Apply the healing glue to a scratch or a slight snag, and it rebonds the mark cold. Keep the repair paste for cracks and shallow hollows, let it dry, then sand it finely to restore a flat surface.
At the slightest sign that the damage is reaching into the thickness of the leather or a seam, stop everything and have the garment examined.
Step 3: reproduce the grain
Once the filler is dry, the natural grain is often flattened where you have worked. Grain reproduction tools, from the impression paste to the kit supplied with its reference samples, re-imprint the pattern specific to the hide and erase the dividing line.
The finest ones harden in under ten minutes, which is handy on a small area touched up on the fly.
Step 4: recolour and fix the repair
A pigmented leather paint evens out the colour and makes the pale traces left by the paste disappear; for a colour that has faded across the whole garment, our guide shows how to recolour a leather jacket with a steady hand. Finally, a finishing varnish seals the repair and protects it from the repeated contact of a bag or a belt.
Which product for which damage
Not sure which treatment to reach for? This guide matches each common mark with the product that deals with it, on smooth and thick leather alike.
| Damage to treat | Sofolk product | In short |
|---|---|---|
| Scratch, fine scuff | Healing glue | Rebonds the fibres, colourless, invisible once dry |
| Open surface snag | Healing glue, then repair paste | Closes the edges, fills, before the colour is restored |
| Cracks, small hollows | Repair paste | Fills, then is sanded for a flat surface |
| Grain flattened after sanding | Grain paste, resin or kit | Re-imprints the hide’s original pattern |
| Stiff leather around the area | Softener | Relaxes the stiffened hide before the repair |
| Tear right through, seam | Professional | Beyond a home repair, affects the garment’s strength |
When to hand the jacket over to a professional
A home repair has a clear boundary: the thickness of the leather. As long as the mark is only on the surface, you can deal with it at home.
As soon as the hide is pierced, a cut gapes open or a seam has given way, a saddler or a specialist workshop must take over: filling with paste would restore neither the garment’s hold nor its strength.
On an item that your safety depends on, a check is always better than a makeshift repair.
The motorcycle jacket and the PPE framework
For a motorcyclist, leather plays a role that the city ignores. A jacket certified to the EN 17092 standard falls into the category of personal protective equipment, and that quality rests on the thickness of the hide as much as on the strength of the seams, never on surface work.
After a slide, the scuff disappears to the eye, but nothing restores the leather’s resistance to abrasion: a jacket that has been pierced, a seam that has opened or an armour pocket that has shifted must first go for a professional check, when they do not call for replacement outright.
Repairing the appearance does not restore the function, and no claim to the contrary deserves to be believed.
Before and after the repair
A successful touch-up is part of a sequence. Beforehand, a clean hide takes the paste better: that is the whole point of the preparation described in step 1.
Afterwards, supple leather holds the repair for longer; remember to nourish a leather jacket after the repair, to stop the cracks reopening as the seasons pass.
Leather that has just been restored also benefits from being kept well away from rain: to waterproof a repaired leather jacket shelters the repair from showers and grease.
And to put each step back in the right order, from cleaning to recolouring, our guide to restoring a leather jacket serves as a common thread, from the first treatment to the final finish.
Why choose Sofolk to repair your leather jacket?
Sofolk designs and manufactures its repair products in France, near Bordeaux, and has done so since 1989. The formulas borrow from the materials used by tanners, for a repair that lasts over time rather than a quick cover-up destined to flake.
One and the same company thus covers the whole process, from filling a snag to recolouring a faded area.
Unsure about the method or the right treatment? Send a photo of the damage to the technical team, who reply by message as well as by telephone.
And if the shade of your leather cannot be found on the colour chart, a simple sample is all we need to make up a leather paint tailored to it. Enough to restore a jacket’s look, without fumbling between two products.
Frequently asked questions about repairing a leather jacket
Can you repair a scuff on a leather jacket yourself?
Yes, provided the mark only affects the surface of the leather. For a scratch, the healing glue is enough: it lays the raised fibres flat again and blends into the grain as it dries. A deeper snag calls for the repair paste, a light sanding, then a touch of colour to erase any scar.
How do you repair a slight snag on a leather jacket?
First degrease the area and leave it to dry thoroughly. Then close the snag with the healing glue, and fill the remaining hollow with the repair paste. Leave to dry, sand finely, reproduce the grain, then recolour to even it out. On thick, stiffened leather, a softening balm makes the job easier before the repair.
Can a tear that goes right through be repaired at home?
No. As soon as the leather is pierced right through or a seam has given way, the home repair stops. Damage to the thickness affects the garment’s hold and, on a protective jacket, its safety: it is a job for a saddler or a specialist workshop, not a surface filler.
How do you repair the cracks in an old leather jacket?
Start by degreasing and drying the area. If the leather is stiff, relax it with the softening balm before any repair. For the hollows that remain, fill with the repair paste, sand, reproduce the grain, then recolour. Supple leather holds the repair better, and the cracks take that much longer to reappear.
Do you need to recolour after repairing a leather jacket?
Most of the time, yes. The repair paste leaves a trace paler than the original colour: a pigmented leather paint erases it and evens out the colour. On a simple scratch treated with the colourless healing glue, the repair can sometimes do without recolouring if the grain remains distinct.


