 FR
 EN
 ES
 IT

Leather shoe repair
Leather is a particularly delicate material that needs regular care. If you own leather shoes, it is important to use suitable products to protect and repair them.
To preserve the original look of your pair of shoes, Sofolk offers a whole range of products for restoring leather shoes. Simple to use and very effective, these products will give the leather back all of its original shine.
So that your ankle boots, shoes or boots are always in perfect condition, do not hesitate to use our products to renovate leather shoes.
Repair is only one stage in restoring a damaged pair to its best. To place this step within the complete renovation of your shoes, from cleaning to protection, take stock before choosing a product.
Our products for repairing your leather shoes
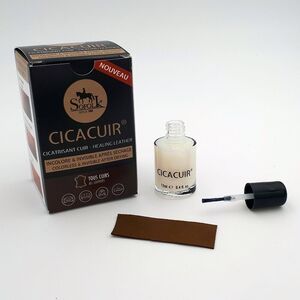
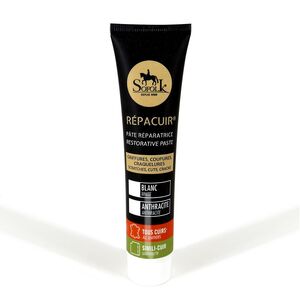
Which repair product should you choose for each type of damage?
Every type of damage has its answer. Identify yours so that you start with the right product, then follow the steps below.
| The damage to the leather | The right repair product |
|---|---|
| Light scratch, clean tear, small cut, clean slit. | Leather healing glue: it bonds the edges without hardening the leather and dries colourless. |
| Cut right through or tear. | Leather healing glue: in its format with a leather patch, slip the patch under the cut, then recolour only if the area remains visible. |
| Deep scratch, scuff, crack, fissure, peeling leather, hole. | Repair paste to fill the hollow, then recolouring to even out the colour. |
| Scuffed toe cap or heel counter, leather worn by rubbing. | Repair paste in thin layers, sanding, then recolouring; never a heel or sole replacement. |
Repairing your leather shoes in 4 steps
Step 1: clean and degrease the leather
A repair only holds on a sound surface.
Start by removing the dust and old polish, then wipe the damaged area to remove the greasy substances that stop the product from taking hold.
On a very dirty pair with stubborn stains, take the time to clean and degrease the leather before any repair using the dedicated method.
Step 2: repair the damage
Apply the healing glue with the supplied brush to cuts and clean tears; it draws the edges together and disappears into the grain of the leather.
For a cut right through, first slip the reinforcing leather patch under the cut, on the reverse side, then bond over the top.
On a deep scratch, a crack or a hole, spread the repair paste with the small spatula, in thin successive layers.
Step 3: sand and level
Once the paste is completely dry, sand off the excess to obtain a smooth surface, flush with the rest of the leather.
This patient sanding determines how discreet the result will be: a repair that stands proud will show through the colour.
Dust off, then degrease one last time before recolouring.
Step 4: recolour and protect
The repair paste leaves a mark, white or anthracite, which has to be covered to restore a shoe of a single tone.
An opaque leather paint hides this mark: recolouring after repairing is therefore essential after using the paste.
Then protect the colour with a colourless shoe polish or a protective wax.
Scratches, scuffed toe caps and cracked leather: treating each case
A simple surface scratch, a scuff that has marked the grain without going through it, can often be corrected with the healing glue, which presses lifted leather back down.
When the scratch has cut into the material and left a groove, fill it with repair paste, sand flush, then recolour the area to erase the mark.
The toe cap and heel counter are the parts most exposed to rubbing: the leather wears away there and eventually peels. Fill the hollow with repair paste, level by sanding, then recolour to restore an even colour.
We are talking about repairing the worn leather of the vamp, not rebuilding a heel or a sole, which are a job for the cobbler.
A torn shoe is not lost as long as the two edges of the tear meet. The reinforcing leather patch, placed behind the cut, acts as a support before the skin is closed again; for a wider tear, the repair paste bonds that same reinforcement in place.
Cracked leather betrays a hide that has lacked care and dried out.
Fill the cracks with repair paste, recolour, then get into the habit of nourishing the repaired leather to soften it and stop fissures reappearing on the flex zones of the shoe.
Why choose Sofolk to repair your leather shoes
The healing glue is an exclusive product, developed and manufactured in-house by Sofolk, which you will not find elsewhere.
A French manufacturer based near Bordeaux for over thirty years, the company designs its own leather care formulas and publishes tutorials and advice pages.
If you are unsure about a type of damage, photograph your shoe and share it on our mutual-help forum: enthusiasts and advisers will point you towards the right step, the one that extends the life of your shoes. You can also reach our team by telephone.
Frequently asked questions about repairing leather shoes
How do you repair a cracked leather shoe?
Cracked leather is filled with repair paste.
Degrease and lightly sand the area, apply the paste in thin layers with the small spatula, respect the drying times, then sand off the excess once dry.
As the paste is a repair product and not a finish, always finish with recolouring to even out the colour and make the repair invisible.
How do you remove a scratch from shoe leather?
A light scratch or a superficial scuff can be put right with the healing glue, which draws the edges together without hardening the leather.
For a deeper scratch that has cut into the material, fill the groove with repair paste, sand flush, then recolour the area.
Avoid home remedies, which are often greasy or discolouring and make the mark worse instead of erasing it.
Can you repair a tear in a leather shoe?
Yes, as long as the two edges of the tear meet. For a cut right through, place the reinforcing leather patch under the cut, on the reverse side, then close the edges over the top.
A wider tear is bonded to a reinforcement beneath the repair paste. After the repair paste, a final recolouring hides the scar; after the healing glue, it is only needed if the area remains visible.
Do you need to recolour after repairing the leather?
Yes, as soon as you use the repair paste. White or anthracite, it shows until the original colour has been restored.
An opaque leather paint then restores an even colour and hides the repair. The healing glue, for its part, dries colourless and blends into the grain of the leather: recolouring is only needed if the area remains noticeable.
How do you repair a scuffed toe cap on a shoe?
The toe cap and heel counter are the areas of leather most exposed to rubbing.
When the surface is scuffed or peeling, fill the hollow with repair paste in thin layers, sand to level, then recolour to restore an even colour.
This is about repairing worn leather, not replacing a heel or a sole, which are a job for the cobbler.


